This article covers how to:
- Activate or deactivate folders and assets
- Publish folders and assets
- Unpublish folders and assets
- Additional publishing information
Activate or deactivate folders or assets
Active assets and folders are visible to users with appropriate permissions. Inactive items are only visible to admins and contributors with appropriate permissions. Only admins can download inactive assets.
Admins and contributors with edit permissions for a folder or asset can edit the status of the folder and assets.
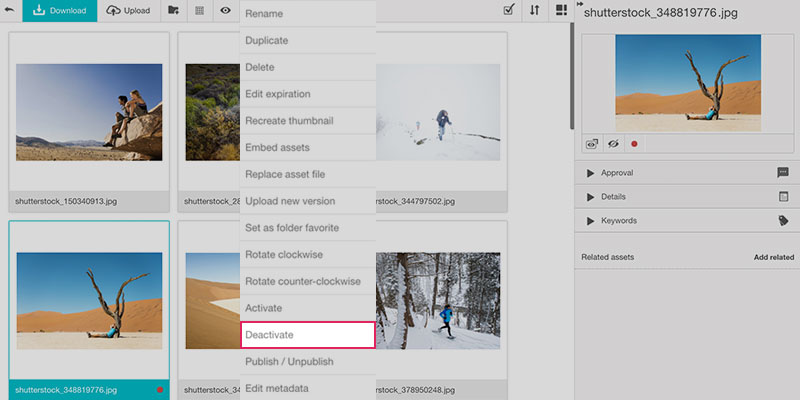
Log into Webdam and select the asset(s) or folder(s) you'd like to activate/deactivate. The status of an asset will display in the asset or folder details panel.
- The
 icon indicates that it is Active.
 - The
 icon indicates that it is Inactive.
To change the status of an asset/folder:
- Click
 in the actions toolbar or details panel and select Activate or Deactivate or click the or icon in the details panel to update the status.
Enable or disable automatic activation:
Admins can elect to have folders and assets automatically activated upon upload or creation.
- Log into Wedam, click
 and select System Preferences.
 - In the Folders section, check the box next to Activate folders upon creation to have folders automatically activated upon creation. Click Save.
- In the Assets section, toggle the slider next to Activate assets upon creation to the On position. Assets will be automatically activated upon upload. Click Save.
To display folders and assets in Brand Connect, they first need to be published by an admin or a contributor with publish permission.
Admins can set their folders and assets to automatically publish to Brand Connect upon activation.
** This feature is available to customers with unlimited asset publishing. If you would like to upgrade your Brand Connect subscription plan, please contact your customer success manager or email success@webdam.com for additional information.
- Log in to Webdam, click the icon and then select System Preferences.
- In the Folders settings section, use the sliders to select which brand portal(s) you’d like to automatically publish assets to. When enabled, assets and folders will automatically publish to the portal when they are activated.
Note: This happens immediately when you have checked the box next to Activate folders upon creation. If you elect not to have folders activate upon creation, this will happen when you activate them manually.
A best practice when you manage more than one brand portal is to disable automatic publishing to brand portals. This will allow you to choose exactly which assets you’d like to publish to each of your portals.
Admins and contributors with publish permissions can schedule a day and time to publish an asset or folder to Brand Connect.
Example use case: You’re launching a new product. The campaign materials and product photos are uploaded to Webdam, but they cannot be launched to the broader audience until a specific date.
**This feature is available to customers with Brand Connect Plus. If you would like to upgrade your Brand Connect subscription plan, please contact your customer success manager or email success@webdam.com for additional information.
Set a publish date
- Log in to Webdam and navigate to the folder(s) or asset(s) you’d like to schedule.
- Click the icon and select Publish/Unpublish.
- Hover your mouse over the portal you’d like to publish items to. The
 button will appear in the Schedule Publishing column.
 - Click Schedule and select the day and time that you’d like to have the items published to the portal. Note: Time zone is automatically based on your computer’s time-zone settings.
- Click Schedule, then click Save to apply your changes.
Edit or delete a publish date
- Click the date in the Schedule Publishing column to open the schedule menu.
- Edit publish date: Select a new date/time and click Update.
- Remove or cancel publish date: Click Remove (Un-publish) to delete a publish date.
- Click Save to apply your changes.
Setting an expiration date will deactivate assets. Inactivated assets will only be visible to admins and contributors. Inactive asset will also not be visible in Brand Portal.
Add an expiration date
- Select the asset(s) and click the icon and select Edit expiration.
- Enter or select an Expiration date and enter any optional comments in the text field. Click Save.
Remove an expiration date
- Click the icon and select Edit expiration.
- Delete the date from the Expiration date field. Click Save. This restores the the original view permissions and publish settings of the asset or folder.
To quickly find expired assets in the current view, open the Status filters along the left side of the page and click ![]() Expired.
Expired.
To manage notifications about expiring or expired assets or deactivate assets upon expiration, click the icon, select System Preferences, and make your selections in the Assets menu. Read more about Asset preferences.
- Log in to Webdam and select to the folder(s) or asset(s) that you want to publish.
- Click the icon and select Publish/Unpublish.
- If you select a mix of active and inactive items, this will be indicated by a yellow Active (Mixed) switch. Leave the switch in the off position to maintain the original settings of the selected items.
- To make all items Active, toggle the switch to the on position and click Save to apply changes.
Note: If you’ve made all items active, moving the slider back to the off position will change all items to inactive which will unpublish them everywhere.
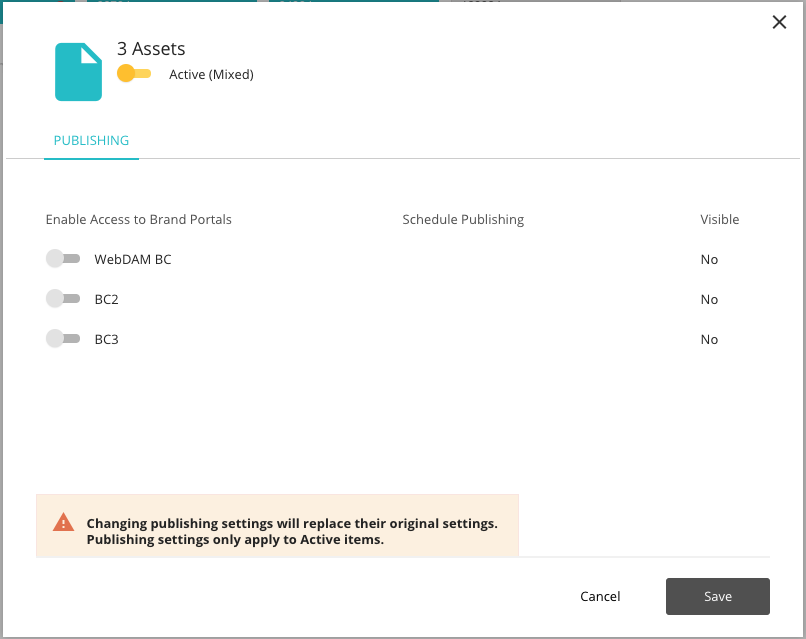
- Brand portal publishing status:
- If all selected assets/folders are published to a portal, the slider in the Enable Access to Brand Portals column will be toggled to the right in the on position.
- If all selected assets/folders are unpublished, the slider will be toggled to the left in the off position.
- If there is a mix of published and unpublished assets/folders, the slider will be yellow and in the off position.
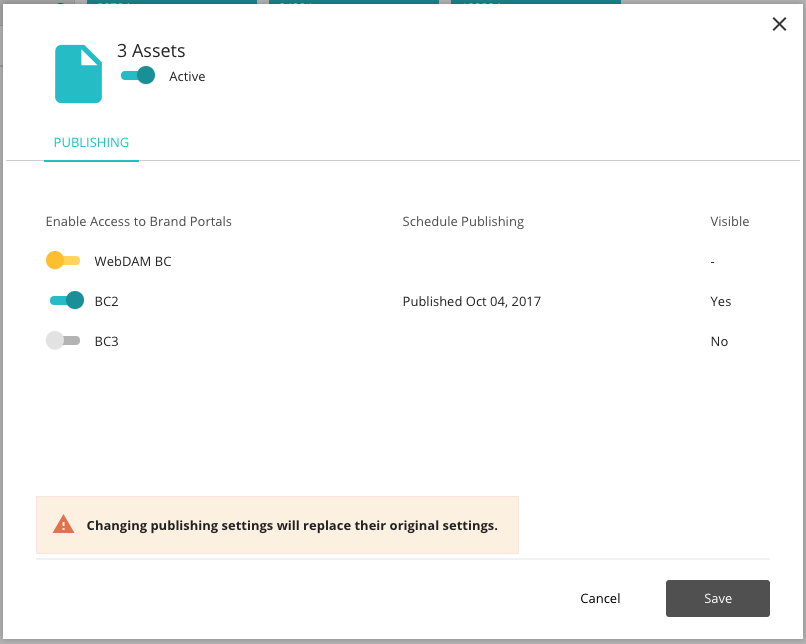
- Under the Enable Access to Brand Portals column, move the slider to the right to the On position to publish only the Active assets. Inactive assets will not be published.
Note: If you’ve published all Active items to a portal, moving the slider back to the off position will unpublish all assets from that portal. - When publishing folders, check the box next to Apply the publishing settings below to all nested folders if you’d like the subfolders to use the same publishing settings as the parent folder - this will publish all subfolders.
- Click Save.
- Log in to Webdam and select to the folder(s) or asset(s) that you would like to unpublish.
- Click the icon and select Publish/Unpublish.
- If all assets/folders are published to a portal, the slider under the Enable Access to Brand Portals column will be toggled to the right in the on position.
- If all assets/folders are unpublished, the slider will be toggled to the left in the off position.
- If there is a mix of published and unpublished assets/folders, the slider will be yellow and in the off position.
- If all items are published to a portal, to unpublish them, move the slider to the left to the off position.
- If there is a mix of published and unpublished assets/folders, you will first need to move the slider to the on position, and then movie it to the off position.
- When unpublishing a folder, check the box next to Apply the publishing settings below to all nested folders if you’d like the subfolders to use the same publishing settings as the parent folder - this will unpublish all subfolders.
- Click Save.
Additional publishing information
- You can manually publish assets or nested folders residing in an unpublished folder. The selected item(s) will display in the Brand Connect portal along with the parent folder(s), which allows users to navigate to it. Unpublished items within the parent folder(s) will remain unpublished and will not display.
- You can also manually unpublish assets and folders residing in a published folder.
- Assets and folders maintain their publish status if they are moved to another folder. For example, if you move a published folder to an unpublished parent folder, the subfolder will remain published.
- If folders or assets are moved to a new parent folder, we recommend either re-publishing or re-unpublishing the parent folder to ensure all assets/folders have the correct publish status.
- Inactive assets and folders cannot be published. To publish, you will first need to Activate them.
- If you deactivate a published folder or asset, it will immediately become unpublished from all portals.
- If you attempt to publish a mix of active and inactive assets or folders, only the active assets and folders will publish.
- The Visible column on the publishing menu serves as a way to further confirm the visibility of folders/assets on a portal.
- If all items are published, in most cases, the status is Yes. In the case that an asset is published, but the parent folder is inactive or unpublished, the status is No.
- If all items are unpublished, the status is No.
- If there is a mix of published and unpublished items, the status is not stated and shows a –instead.
Updated
Comments
3 comments
This article mentions that only admins can download inactive assets. However, I came across a setting under permissions where you can 'Allow contributors to download inactive assets'. May be worth mentioning that in the article.
Hi Cecilia,
Thanks for noticing that. Indeed, that's a new feature we added last month and I'll make sure this article is updated.
the article mentions contributors with publish permission, I do not see any additional settings that permit specification of a publish permission. Is there a combination of other permissions that drives the ability to publish?
Article is closed for comments.