The SAML integration with Webdam should be handled by the company’s SAML admin. The SAML admin will require a Webdam account with admin privileges.
- Log into Webdam as an admin.
- Navigate to
Settings-> System Preferences -> SAML Settings.
-
Download Webdam’s SAML 2.0 Metadata XML file.
-
 Add Webdam’s SP Metadata XML file into your company’s IdP.
Please ignore the NOTE section that says not to set the claim with "NAME ID" as "Outgoing Claim type."
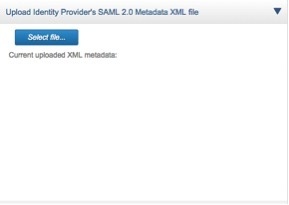
- Click Select file in the Upload Identity Provider’s SAML 2.0 Metadata XML section to upload your company’s IdP XML file.
- In the Custom Attribute Field Mappings section, enter the attributes returned by the IdP to properly map to Webdam’s defined fields.
Webdam requires the following attributes from the IdP:- Username
- First Name
- Last Name
- Email Fields
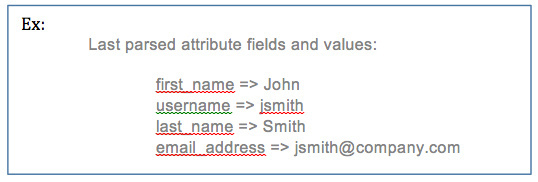
The Last parsed attribute fields and values section displays the attribute information returned by the IdP from the last login. Use this section to help properly map the IdP attributes to the Webdam fieldnames.
Note: This section will be empty until SAML login is performed. See Testing SAML login below. If the section remains empty after a SAML login, the IdP may not be properly configured to return attributes to the SP (Webdam).
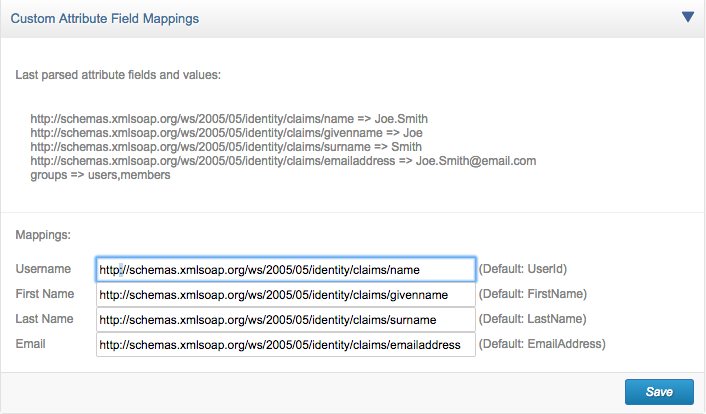
Example ADFS attribute mappings:
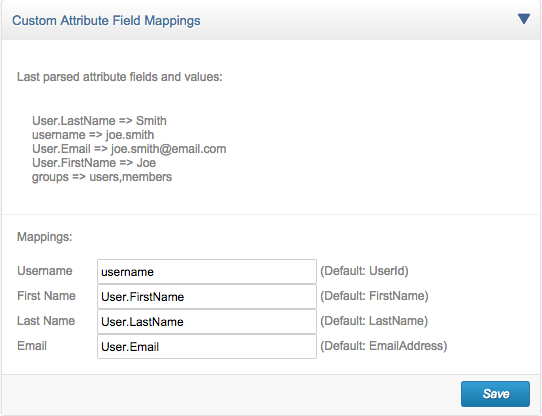
Example OneLogin attribute mappings:
Example Shibboleth attribute mapping:

Testing SAML login
- Add /saml.php to the end of your Webdam URL in order to test the SAML login. For example, http://company.webdamdb.com/saml.php.
- The browser will redirect to your company’s IdP. After entering the SAML credentials, you should redirect back to Webdam authenticated.
Note:
Receiving a Registration successful notification indicates SAML authentication was successful, but the new user account created in Webdam is set to Inactive. To allow new users to automatically log into Webdam, log into Webdam as an admin and navigate toSettings-> System Preferences, and uncheck New users must be approved after registering in the Users and Groups section. - Verify that the user’s account is automatically created in Webdam.
- Log into Webdam as an admin and navigate to People-> Users.
- Confirm that the user account exists.
- If the user account was not created, check the Attribute Field mappings (Step 6 in SAML setup).
Enabling SAML login
- Navigate to Settings > System Preferences > SAML Settings.
- Check the box next to Enable login button on Splash page in the Splash Page section.
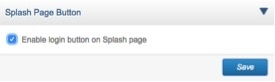
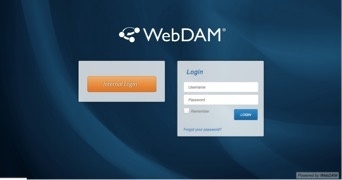
- The Webdam splash page should now display the Enterprise Sign-in button which will trigger the SAML login.
- The Splash Page can be found by adding /splash.php to the end of your Webdam URL.
Additional configuration options:
- Enable Single Sign-out: This option is legacy and no longer supported.
-
Disable Splash Page (auto login): Check the box if you would like to disable the Splash Page. This will direct users to the SAML login, bypassing the Webdam Splash Page.
Note:- If you have users outside of the company’s IdP, we recommend that you leave the splash page enabled.
- If you or other users need to access the splash page, you can always navigate to it by adding /splash.php to the end of your Webdam URL.
Important:
You may implement SAML at any time, but we recommend that you set SAML up during the initial onboarding process. If you implement SAML post-implementation, you might run into duplicated user accounts. To avoid this, ensure that the username attribute returned by the IdP is the same as the current username in Webdam. If the username attribute is not located in Webdam, a new Webdam user account will be created.
Additional Resources:
Please reach out to the support team if you would like documentation setting up Webdam SAML with OKTA or AZURE.
Updated
Comments
0 comments
Article is closed for comments.